Thursday, June 29, 2023

Dehydrating To Preserve the Harvest

Dwarfed Blue Curled Kale dried and blended to a  powder is great to add to smoothies


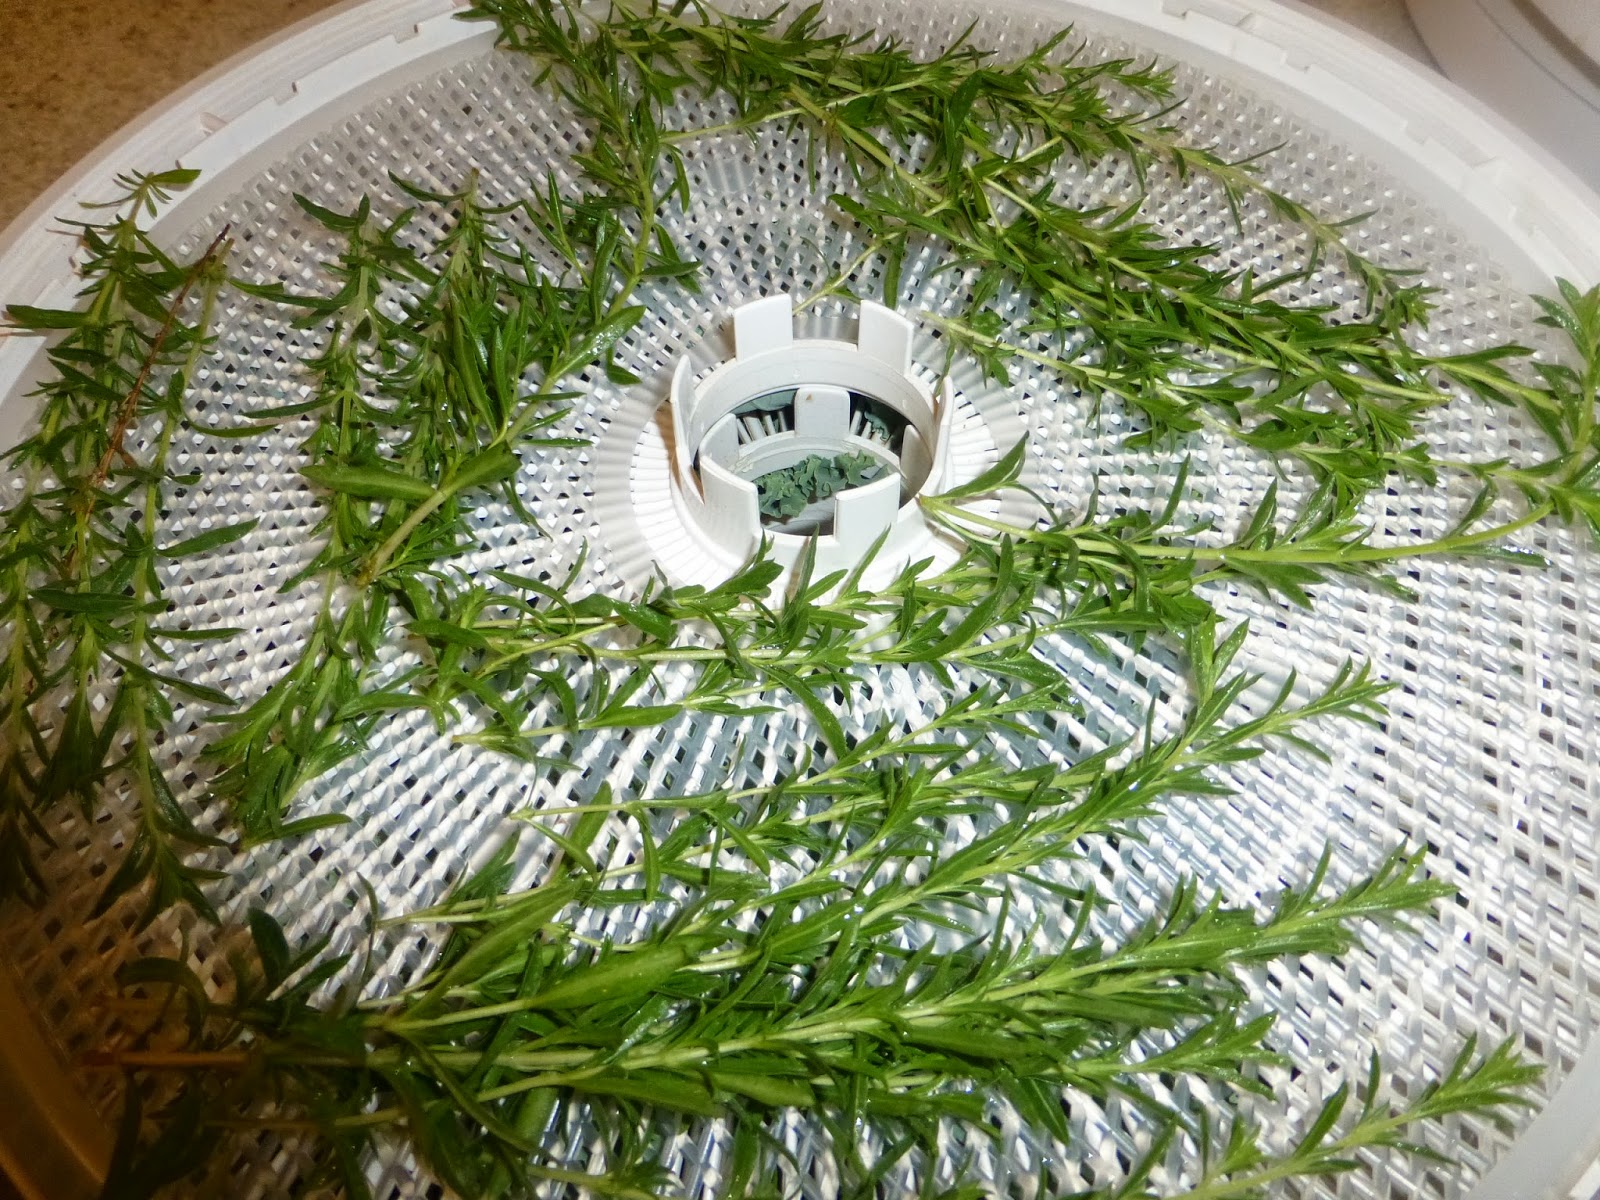
The dehydrator is running almost every day during this time of year. It's a great way to preserve fruits, vegetables, and herbs.   Herbs I pick in the morning, rinse, and pat dry.  I put them in the dehydrator at the lowest setting. You can store them in ziploc bags or canning jars. I remove the leaves from the stems after they are dried.


Oregano

Winter Savory


Dried Strawberries are a favorite snack.


The strawberries are sliced into a solution of water and lemon juice 4:1.  You can also use lime juice or pineapple juice.  Fruits I dry at 130 - 135 degrees.  I rotates the trays throughout the process.  When done they should still be pliable.  Dehydrated strawberries are irresistible!


The finished product.  It's best to take the fruit off trays right when you turn off the dehydrator to prevent sticking.


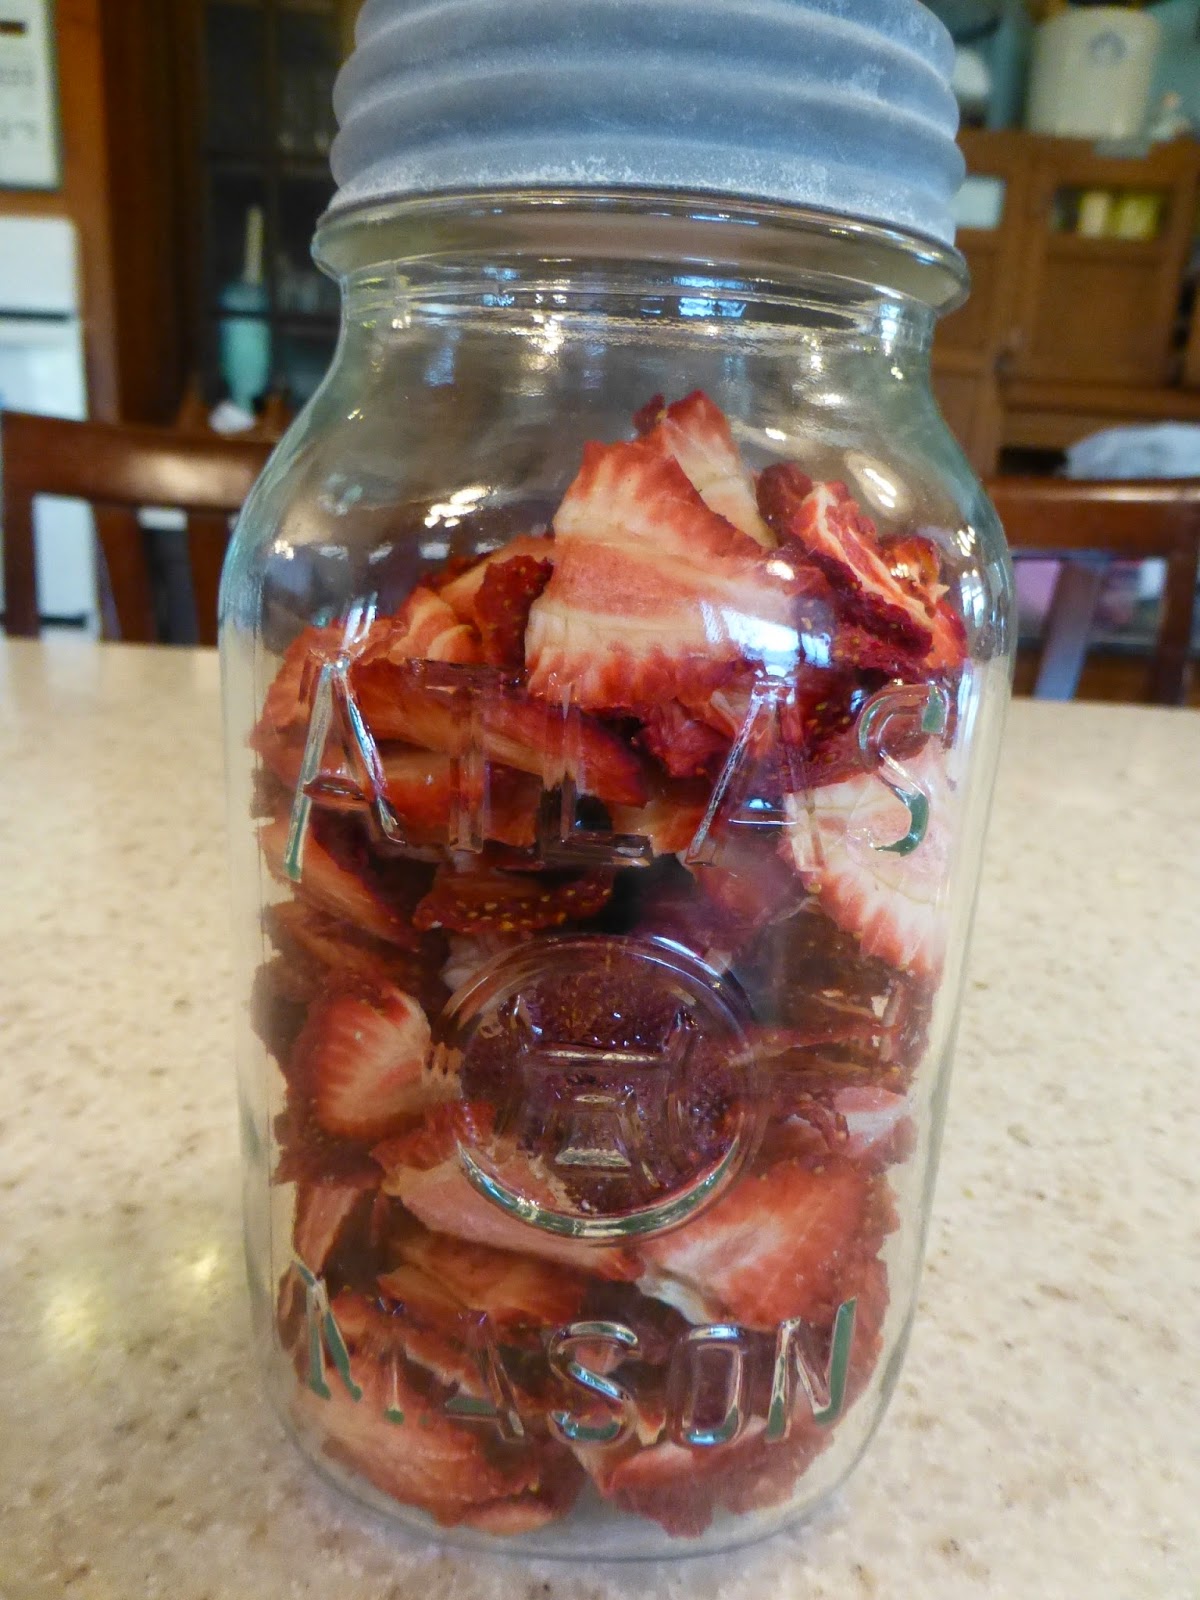
Store in an air tight container.

Pretreating Fruit

Dipping fruit in a pretreatment prevents them from oxidizing.  The fruit will brown, lose some Vitamin A and Vitamin C during oxidization.  Lemon juice makes an excellent natural pretreatment.


Use 1 cup of lemon juice to one quart of water

It is best to not leave the fruit in the dip for more than 10 minutes.


Always use high quality produce picked when ripe.


Dried white peaches, principe tomatoes, and pears


Fun Dehydrated Products:


Zucchini and kale can be dried into chips. Season with your favorite spices. 

Dried pears are amazing! 

White fleshed peaches are amazing dried. They are to soft to can.

Dried peaches


Apple rings.  Try dipping one side in cinnamon and sugar before drying.

Spinach and kale can be dried and then powdered to add to smoothies

Peppers can be dried and blended until powdered and used to make you own chili powder.

Fruit leather. I add applesauce to sweeten. It also helps with the consistency and makes a better product.

Dry flowers for decorating projects.


Dried Tomatoes

These are wonderful to add to a homemade or frozen pizza.  Slice any tomato and sprinkle with a small amount of brown sugar, basil and oregano.  Using colorful heirlooms makes these simply gorgeous.

Add caption


Get that dehydrator out and start preserving your harvests.  


Monday, June 26, 2023

Gooseberry Coconut Cake


While most gardeners in the United States are unfamiliar with gooseberries, in Europe they are a common and loved dessert berry.  If you do not have gooseberries in your garden they are definitely worth a try.  They are relatively disease free and the deer won't touch them because of the the thorns.  They ripen mid June through July giving you a long harvest.  Gooseberries can be green, pink, and a deep purple depending on the variety. Both underripe and ripe berries have a purpose and can be mixed in both jams, pies, and desserts.  This post will focus on an absolutely yummy and irresistible cake.


Ingredients

Cake

  • 1/2 cup butter (allow to rest a room)
  • 1/2 cup sugar
  • 3 large eggs
  • 3/4 cup flour
  • 3/4 cup coconut
  • 3/4 tsp baking powder
Topping
  • 1 1/2 cups gooseberries
  • 5 Tbsp sugar
  •  2 1/2 Tbs flaked almonds
  • Powdered sugar for dusting
Instructions
  1. Top and tail the gooseberries and mix with the 5 Tbsp of sugar.  I use scissors to do this.  The tops are where the berry attached to the bush and the tails are the remains of the flower I like to remove both.
  2. Preheat the oven to 375 F
  3. Grease an 8" cake pan
  4. Cream together the butter and sugar until fluffy
  5. Add the eggs and mix until smooth
  6. Spoon the mixture into the cake pan and spread evenly
  7. Top with the gooseberry and sugar mixture
  8. Bake for twenty minutes
  9. Sprinkle the almond over the top and bake for ten or more minutes until knife come out clean
  10. Allow to cool
  11. Remove from tin if desired and dust with powdered sugar.

Links to other gooseberry posts:


Favorite Green Bean Recipes


Green beans can be prepared in a variety of ways.  The method you choose in cooking your green beans should be based on the age and thickness of the bean.

Super fresh green beans about the thickness of a pencil are best boiled and dressed with a vinaigrette or sauce.  With older thicker beans, consider roasting them.  Roasting infuses and concentrates the flavor of older beans while the fresh sweet flavor of younger beans is preserved best by boiling.
 
Slenderett, Royal Burgundy (H), and Pencil Pod (H)

Types of Beans
Green beans are eaten young while the seeds are immature.  Yellow wax beans and purple beans are cooked and prepared just like green beans.  They are best eaten fresh when the thickness of a pencil.  

Haricots verts which is French for green bean are a delicate bean often used as a fillet bean.  They are best boiled or blanched but require a shorter cooking time. They are a gourmet bean worth growing.

The old fashioned string bean had to be stringed before cooking.  With so many choices of stringless beans I do not see a reason to grow a string bean.  The stringless beans only need the tips snapped off and they are ready to cook.

 Recipes

Below are just a couple of our families favorite green bean recipes.   

Roasted Green Beans


This is a great recipe for the less than prime green beans that are produced late in the season.  Older, thicker green beans seem to have less flavor and the roasting seems to intensify the flavor.  Any of your favorite combinations of herbs can be used.  

2-3 Tbs of olive oil
2 fresh garlic cloves minced
1 Tbs. fresh minced ginger root
 Salt
Fresh ground pepper
1 lb of green beans with end snapped off

Mix the oil, garlic, ginger root, salt, and pepper in a boil.  Spread the beans on a shallow tray and drizzle and baste with all the oil mixture. Roast at 450.  Turn the beans once.  Roast until lightly browned approximately 15 minutes.


Green Beans & Lemon Chiffon Sauce
 (Taste of Home June/July 2007)
My family loves these beans. The sauce is also good on broccoli.

1 1/2 lbs fresh green beans with ends trimmed
1/2 Tbs cornstarch
3/4 cup of chicken broth
3 beaten egg yolks
1/8 cup of Parmesan cheese
1/8 cup lemon juice
1/4 cup of butter, cubed
2 tsp fresh parsley
2 tsp chopped green onion

Place beans in water, bring to a boil, and cook until tender crisp.  In a small saucepan whisk the cornstarch, broth, egg yolks, Parmesan cheese and lemon juice.

Cook stirring constantly over low heat until the mixture thickens and bubbles around the edges.

Add butter, a little at a time, whisk to help melt.  Stir in the parsley and onions.  Drain the beans and top with this delicious citrus sauce.


Sunday, June 25, 2023

Quick Guide to Growing Green Beans


Green beans are an easy crop to grow that will give even the beginning gardener a great harvest.

Growth Habit

Green beans have threes possible growth habits:  pole, semi-bush, and bush.  Pole and semi bush need trellising or staking while bush beans do not. Your seed package will tell you which type you have.  I have grown all three types.  With tall pole beans they will do better in an area protected from wind.


Types of Green Beans

Green Beans or Snap Beans

Green Beans are long, round, and of course green.  There are yellow varieties that are referred to as wax beans.  Yellow keep their color when cooked.  There are also purple varieties that add beautiful color, but when cooked they do turn green.  Most varieties no longer have the fiberous string running down the side which led to the name string beans.  Some heirlooms can still be found with strings.

There are many delicious recipes for green beans, but they can also be pickled and canned.

Haricot Verts or French Green Beans or Filet Beans

These are my favorite fresh eating variety and are considered a gourmet bean.  They are long and thin and tender. They also come in yellow and purple varieties.

Long Beans

Long beans or yard long beans are actually a different family.  If too long they are tough so look for beans that reach 12-18 inches.

Romano Beans or Flat Beans

These beans are flat and wide.  They should be eaten young before the bean seeds develop and require longer cooking times.  The are said to be very flavorful.

All green beans are interchangeable in recipes with maybe a slightly different texture and color.


Cultivating Green Beans

Green beans can be planted when the soil temperature is 
60-65F; however they are a tender crop so wait until there is no threat of a freeze. You can succession plant a couple crops 2 weeks apart to extend the harvest.

Always direct seed beans.  Plant bush beans an inch deep with 4 plants per square foot. Pole beans can be planted along a trellis 3 inches apart.

When seedlings first emerge, birds, grasshoppers, pillbug, and slugs can be a problem. Any product containing iron phosphate will take care of slugs and pillbugs.  If birds and grasshoppers snack on your seedlings cover with a floating row cover until the true leaves appear.

Watering needs at planting are low and increase as the plants mature.  Beans will stop flowering if not given enough water.  When plants flower increase watering and water heavy through harvest.

Harvest regularly to keep them producing. The more regularly you harvest the more they set flowers. If you planted a determinate crop they produce one big crop and are then finished but most will keep on producing til a freeze.  I like to harvest green beans and wax beans when they are the size of a pencil. Haricot beans are harvested when diameter is smaller than a pencil .


Fertilizing

Beans do not need much in way of fertilizer.  If you incorporated 1-2 inches of compost into your soil prior to planting you will get a healthy crop.  Green beans are legumes which fix nitrogen from the atmosphere with the help of the bacteria rhizobia in nodules found on the roots. Watch for a post explain the process of nitrogen fixing. In newer beds you can inoculate your soil with the bacteria used by legumes to fix nitrogen.  It is sprinkled in the furrow or hole you plant the beans in.

 Links to green bean recipes and canning info:


Tuesday, June 20, 2023

Gooseberry Jam


Gooseberries are not very familiar to North Americans but Europeans are very familiar with the gooseberry.  They have been grown for hundreds of years and are the perfect addition for the homesteader or backyard gardener.  Hopefully this delicious jam encourages you to plant a few bushes.  Cultivating and planting are easy and this is a low maintenance deer proof beautiful bush.


For jam, gooseberries should be soft and ripe.  Gooseberries can be either green or red.  I prefer the red because it makes a beautiful jam.  This recipe can be doubled.  It is a no pectin recipe because gooseberries are naturally high in pectin, but be sure to follow cooking instructions so it sets.

Makes 4 half pints

6 cups gooseberries ( tails and stems removed)
water or red currant juice
4 cups sugar
Pinch of salt

1.  In a large stainless steel pot, simmer gooseberries, covered in a little water or red currant juice.  Mash if desired


2.  When the berries have softened, add in the sugar and salt.


3.  Bring to a boil.  Boil uncovered for 10 or 15 minutes stirring occasionally until one of three things happens.  Actually all three will happen just decide how you will determine when the jam reaches gel stage.
1 .  Jam reaches gel stage 220 F use a kitchen thermometer. 
2.  Bubble change in texture; they become glossier and slower to pop.  
3.  The jam sheets off a spoon rather than drips.

Bubbles before gel stage

The bubbles when close to gel stage are glossier and slower to pop.

4.  Remove jam from heat skim if desired.

5.  Fill hot jars to 1/4 inch from the top, wipe rims, and seal.


6.  Process in a boiling water canner for 10 minutes.  Add 10 minutes for high altitude areas.

7.  When finished processing, remove the canner lid and allow to sit for 10 minutes then remove jars from the water bath canner.


8.  ENJOY your delicious unique Gooseberry Jam!


Variation:-black currant jam substitute 1/2 to 1 cup black currants for 1/2 to 1 cup gooseberries.  This jam is similar to Jostaberry Jam.  The jostaberry bush is a cross between gooseberries and black currants.

Finished Gooseberry Jam!  I remove the rings for storage.


Sunday, June 18, 2023

Growing Loganberries


Loganberries are a cross between a blackberry and a raspberry so they are one of the hybrid berries.  What is a hybrid berry?  Well it doesn't occur naturally and must be cross pollinated to be produced.  While these berries may be found at farmer's markets they are not typically found in grocery stores.  They are perfect for the berry enthusiast and will be productive in the home garden.  

Loganberries are named after James Harvey Logan, who was an amateur breeder of raspberries and blackberries. He discovered this natural hybrid growing in his garden in California in the 1880s, and named it after himself.  (BBC Gardener's World)  

The fruit of loganberries resemble a raspberry in appearance but are larger.  They ramble like a wild blackberry. The ripe berries are a beautiful jewel tone of reddish purple.

Loganberries have trailing thornless vines although there are varieties with thorns.  The have a staggered ripening period and the fruiting season can last up to 2 months.


Cultivating Loganberries

Choose a sunny location with loamy soil that drains well.  Mix organic matter into the soil prior to planting.  A trellis will help keep canes and fruit off the ground.  Be careful when tying canes up they break easily.  

The first year no pruning will be required.  Fruit is born on 1 year old canes and then the canes die so you can prune the cane down to the ground after fruiting or prune it the following spring. Try to keep only 10 to 12 canes per bush.

Each spring clean up plant debris around the bushes.   Sprinkle a complete dry organic fertilizer around the bush and spread a layer of compost on top.  When buds appear water in fish emulsion and kelp.

Loganberries like a blackberries retain the core when picked.  They can be used in any recipe for raspberries or blackberries.  Loganberries make delicious jams, jellies, and syrups.  Try them in muffins, cobblers, and crips and you won't be disappointed.

I love cultivating berries so the loganberry is part of my berry garden which includes the more commonly knowblackberries, raspberries and strawberries but the lesser known gooseberries, jostaberries, tayberries, Marion berries, boysenberries, and elderberries. 


Saturday, June 17, 2023

Gooseberries


No kidding it's a real berry!  A gooseberry is also a term referring to a "fool."  Put them together and you have an English dessert call Gooseberry Fool which is stewed gooseberries folded into a cream.    It may be fool hardy to not try this backyard small fruit in your garden.  It is a slightly tart grape size berry used to make desserts like pies, tarts,  jellies, and jams.  This small bush is more common in European gardens than in American gardens, but is gaining in popularity.


"In Europe in the 1800s, as many as 722 gooseberry varieties were in existence, and "gooseberry clubs" were established by enthusiasts. Most of the European varieties were large fruited and sweet as a result of centuries of selection and breeding, while American types had less desirable flavor and more disease resistance." (Penn State)


The gooseberries available to the home gardener today are usually a hybrid of both the European and American varieties.
It is in the ribes family along with currants. Unlike the currant, gooseberries have thorns which means careful picking but also means you can use these woody shrubs in the landscape because the deer will steer clear.

This 3 to 5 foot bush with arching branches produces slightly tart green fruits the size of a marble.  Some cultivars ripen to a pink or burgundy.  The skins are translucent and the fruit has a tail. They ripen in throughout July and hold on the bush nicely.


Planting and Care


Gooseberries are an easy to grow shrub.  Purchase 1-2 year old plants in early spring.  Plant bushes 3-4 feet apart.  You can propagate from your existing plants using stem cuttings and the arching branches will layer if left on the ground.  In the planting hole I add a handful of a dry organic fertilizer mixed with some compost.

Once established, I fertilize with an organic dry fertilizer in early spring.  During the growing season I also fertilize with fish emulsion and sea kelp.


Pruning


Fruit is produced on  small spurs of 2 and 3 year old wood.  Older wood will become less productive so the these are the pruning goals:  


  1. Remove branches lying low to the ground 
  2. Remove older wood leaving new shoots to replace the old
  3.  Remove crowed branches and open up the center.  You want to be able to pick without too much danger of the thorns.  Overcrowded branches means more "ouches" when picking


Harvesting

Gooseberries ripen late June and through July.  Underripe berries can be used in jellies and jams.  The underripe berries are high in pectin and can be mixed with ripe berries in recipes that do not need pectin.  Ripe and overripe berries are perfect for pie fillings, tarts, and stewed gooseberries to use in Gooseberry Fool.  These can also be canned or frozen for use later. One of my favorite desserts is this Gooseberry Coconut Cake.  So delicious!


Friday, June 16, 2023

Controlling Grasshoppers in the Garden


 Grasshoppers can  be devastating to gardens as well as landscape. The number of grasshoppers depends on weather and biological conditions. Grasshopper females lay eggs in late summer.  They deposit these elongated masses of eggs in the soil.  Early spring grasshopper nymphs which resemble the adults but are smaller emerge.  The nymphs frequently molt and take 40-60 days to develop into adults.  

Utah has three major groups of grasshoppers: the slant-faced grasshoppers, the band-winged grasshoppers, and the spur-throated grasshoppers. (USU Vegetable Pest Advisory)

The slant-faces, as their name implies, generally have angled faces and long, thin bodies that enable them to blend into the grassy vegetation. (USU Vegetable Pest Advisory)


The banded-wings are the conspicuous hoppers with often brightly colored hindwings that snap and crackle as they fly short distances. The banded-wings are especially common in open desert and scrub; they blend in well with their brown surroundings. (USU Vegetable Pest Advisory)


The spur-throats include the most injurious species. Their name derives from the tubercle projecting between their front legs. (USU Vegetable Pest Advisory)

Damage from Grasshoppers

Grasshoppers with their chewing mouth parts can devour a whole plant or leave ragged holes in plants.  Grasshoppers love young green plants of corn, lettuce, bean, carrot, onion, some annual flowers, and melons. Damage occurs in the early summer after rangeland weeds dry up and usually lasts for a few weeks. (USU Vegetable Pest Advisory)


Management:

Grasshoppers are difficult to manage because different species hatch a different times and they can travel long distances.  It's best to go after the young nymphs in spring.

  • Row Covers:  Row covers are a plant fabric used to protect crops from cold and insects.  They need to be removed; however, for pollination.  If this is done in early morning grasshoppers are less active.  The crops can be covered again in the afternoon.
  • Use baits. The insecticide, carbaryl, is mixed with wheat bran to create a bait. Spread it evenly throughout the habitat and reapply weekly. The bait can also be placed inside a container, such as PVC pipe segments, to protect it from getting wet (wet bait is no longer attractive to grasshoppers). Carbaryl is toxic to beneficials but safer for bees if used as a bait. It is not an organic spray.  USU Vegetable Pest Advisory
  • Nosema locustae is a biological insecticide bait that must be applied to early nymph stages and is specific to grasshoppers.  It is a fungi that affects the digestion of grasshoppers.  It contains azadirachtin, a natural biological agent that is found in neem oil; and organic pyrethrins. If organic control is your goal, avoid compounds labeled as pyrethroids. These pesticides add synthetic chemical compounds to natural pyrethrins, and thus cannot be considered organic pesticides. After feeding on the bait, grasshoppers stop feeding, become lethargic, and die. The disease is contagious and will infect other grasshoppers that cannibalize diseased grasshoppers in the area. (USU Vegetable Pest Advisory)
  • Kaolin Clay is a white clay sprayed on plants to discourage feeding insects.  The clay is irritating to insects.  It can discourage young grasshoppers nymphs. This is only a deterrent.
  • Encourage predators that eat grasshoppers.  Birds, praying mantis, toads, chickens, and some snakes. While chickens eat grasshoppers they will also eat and damage your garden but you could make a chicken run around your garden.  Toads and praying mantis are easier to encourage in the garden but their impact will be small on large grasshopper populations. Personally not too excited about snakes in my garden.  They may keep me away.
  • Tilling, weeding, and mowing.  If your garden is in a meadow mow a 6ft strip around the garden this makes it easier for predators to find grasshoppers and the low grass offers no food for nymphs. Grasshoppers lay eggs in the soil and the eggs overwinter and hatch in spring. Tilling the garden, turning raised beds with a shovel, or tilling ground around the garden in late fall and early spring will destroy eggs that were laid the previous summer. 
  • Aerial sprays can be coordinated with the Utah Department of Agriculture and Food. The USDA threshold for rangelands is 9 nymphs per yd2; agricultural thresholds would likely be lower. (USU Vegetable Pest Advisory)
Having given all these options grasshoppers are a difficult pest to control. Large infestations caused by migratory grasshoppers seem to be cyclic and are very difficult to manage. They cause extensive crop damage. They have multi-year cycles but will decline with each year. 

The average grasshopper population will also be more challenging to handle if your garden is in a meadow.  Hot dry conditions mean more grasshoppers.  

On an average year you should have some success using multiple methods mentioned above.  
  • For example tilling or turning beds in fall and early spring. 
  • Mowing a 6 ft wide strip around your garden. 
  • Using the bait Nosema lucustae in early spring when nymphs appear, remember it is only effective on the young nymphs.  
  • Covering crops the grasshoppers like such as corn, beans, carrots, and lettuce.
  • Using kaolin clay as a deterrent
I'm linking to USU Grasshopper Pest Advisory that is more specific on products labeled for use on grasshoppers in Utah and how to use them.  These products are not organic but you do have these options if your garden is only feeding the grasshopper population and not your family.
Comment if you have had good results with any of these products.